Thursday, December 30, 2010

Lick the Plate Good: Gluten-free Pot Roast

I absolutely LOVE my Mario Batali Dutch Oven.  It is so easy to make hearty Gluten-free recipes. I made this pot roast last weekend and it came out so good, I literally licked the plate clean!! 


I used Herb Ox bouillon packets to make the beef broth and Pacific chicken broth.  I also added potatoes to the pot when I put the meat back in, and let it cook for about 4-5 hours in the oven.  The meat was so tender it just fell apart on the plate. Serve with gluten-free biscuits or bread and it's a meal to warm you up this winter!


Ingredients

1 chuck-eye roast (about 3 1/2 pounds), boneless
2 tablespoon vegetable oil
1 medium onion, chopped medium
1 small carrot, chopped medium
1 small rib celery, chopped medium
2 medium cloves garlic, minced   
2 teaspoons granulated sugar
1 cup low-sodium GF chicken broth
1 cup low-sodium GF beef broth
1 sprig fresh thyme
1 1/2 cups water
1/4 cup dry red wine

Instructions

  1. Adjust oven rack to middle position and heat oven to 300 degrees. Thoroughly pat roast dry with paper towels; sprinkle generously with salt and pepper.
  2. Heat oil in large heavy-bottomed Dutch oven over medium-high heat until shimmering but not smoking. Brown roast thoroughly on all sides, reducing heat if fat begins to smoke, 8 to 10 minutes. Transfer roast to large plate; set aside. Reduce heat to medium; add onion, carrot, and celery to pot and cook, stirring occasionally, until beginning to brown, 6 to 8 minutes. Add garlic and sugar; cook until fragrant, about 30 seconds. Add chicken and beef broths and thyme, scraping bottom of pan with wooden spoon to loosen browned bits. Return roast and any accumulated juices to pot; add enough water to come halfway up sides of roast. Bring liquid to simmer over medium heat, then place large piece of foil over pot and cover tightly with lid; transfer pot to oven. Cook, turning roast every 30 minutes, until fully tender and meat fork or sharp knife easily slips in and out of meat, 3 1/2 to 4 hours.
  3. Transfer roast to carving board; tent with foil to keep warm. Allow liquid in pot to settle about 5 minutes, then use wide spoon to skim fat off surface; discard thyme sprig. Boil over high heat until reduced to about 1 1/2 cups, about 8 minutes. Add red wine and reduce again to 1 1/2 cups, about 2 minutes. Season to taste with salt and pepper.
  4. Using chef’s or carving knife, cut meat against the grain into 1/2-inch-thick slices, or pull apart into large pieces; transfer meat to warmed serving platter and pour about 1/2 cup sauce over meat. Serve, passing remaining sauce separately.

Wednesday, December 29, 2010

Holiday Treat: Tiramisu


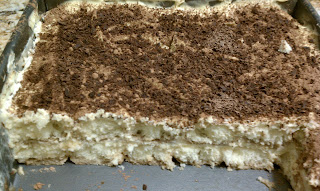
This holiday I was happy to make my new husband his FAVORITE dessert, tiramisu, GLUTEN-FREE - thanks to Schar's gluten-free ladyfingers!  I found these at Whole Foods and they tasted light and airy, with a slight tangy lemon-zest.

This is a family recipe from my sister-in-law and it came out great.  I'll definitely be making this dessert for many years to come.  I needed 2 packages of the ladyfingers and used an 8" square cake pan. 

I also wanted to thank Starbucks as they were super helpful and provided me with the espresso beans, ground special for me, and given to me for free! 


Ingredients
6 egg yolks
3 tablespoons sugar
1 lb. mascarpone cheese
1 1/2 cups espresso, cooled
2 teaspoons dark rum
24 ladyfingers (2 packages of Schar's Gluten-Free Ladyfingers)
1/2 cup bittersweet chocolate shavings
1/2 cup cocoa powder

1. Beat egg yolks and sugar until thick and pale - about 5 minutes
2. Add cheese and beat until smooth
3. Add 1 tablespoon of the espresso and mix well
4. In small shallow dish add remaining espresso and rum.  Dip the lady fingers in it the espresso for 5 seconds
and place the soaked ladyfingers in the bottom of an 8" cake pan.
5. Spread 1/2 of the cheee mixture over ladyfingers
6. Add another layer of ladyfingers and top with remaining cheese mixture
7. Cover the top with a layer of cocoa powder

Refrigerate for 2  to 8 hours.  Add chocolate shavings just before serving

Friday, December 17, 2010

Bagel and a Schmear: Udi's saves breakfast!


One of my most favorite breakfasts used to be a bagel and cream cheese...until I realized I had Celiac disease and stopped eating gluten in 2006.  I thought it was bye bye bagels....and since that time, I have not found any bagel products that were quite as good as the "real thing."  Until Udi's.

Udi's Bagels toast well and give you that crispy outside crunch while maintaining the doughy inside.  Pair it with some cheese and coffee for a great start to the day.

Thanks for bringing back breakfast Udi's!

Tuesday, December 14, 2010

Gluten-Free Lasagna: Worth the work!


I was so excited to make my husband's favorite meal last weekend but forgot how much work it can be!  Definitely worth the effort though, because this dish was truly delicious and fulfilling, despite my error on the no-boil GF noodles!


I usually use the DeBoles no-boil GF lasagna noodles but they tend to be broken in the box and are pretty brittle.  I heard of a trick where you soak the noodles briefly in water prior to layering them in the casserole dish.  However I wound up soaking them too long resulting in a messy pot of broken noodles.  After careful work, we were able to lift each part of the noodle out of the pan and layer it in the dish as the recipe calls for this.


My lesson learned from this experience is that the noodles are the least important part of the dish...they cook beautifully in the oven and as long as your cheese/sauce come out good, it's a hit!  Recipe below:

INGREDIENTS


Tomato-Meat Sauce
1 tablespoon olive oil
1 medium onion , chopped fine (about 1 cup)
6 medium cloves garlic , pressed through garlic press or minced (about 2 tablespoons)
1 pound meatloaf mix or 1/3 pound each ground beef chuck, ground veal, and ground pork (see note)
1/2 teaspoon table salt
1/2 teaspoon ground black pepper
1/4 cup heavy cream
1 can (28 ounces) tomato puree
1 (28-ounce) can diced tomatoes , drained

Ricotta, Mozzarella, and Pasta Layers
15 ounces ricotta cheese (whole milk or part skim), 1 3/4 cups)
2 1/2 ounces grated Parmesan cheese (1 1/4 cups)
1/2 cup chopped fresh basil
1 large egg , lightly beaten
1/2 teaspoon table salt
1/2 teaspoon ground black pepper
1 box no-boil GF lasagna noodles (DeBoles is a great choice)
16 ounces whole milk mozzarella , shredded (4 cups)

INSTRUCTIONS
1. Adjust oven rack to middle position and heat oven to 375 degrees.

2. Heat oil in large, heavy-bottomed Dutch oven over medium heat until shimmering but not smoking, about 2 minutes; add onion and cook, stirring occasionally, until softened but not browned, about 2 minutes. Add garlic and cook until fragrant, about 2 minutes. Increase heat to medium-high and add ground meats, salt, and pepper; cook, breaking meat into small pieces with wooden spoon, until meat loses its raw color but has not browned, about 4 minutes. Add cream and simmer, stirring occasionally, until liquid evaporates and only fat remains, about 4 minutes. Add pureed and drained diced tomatoes and bring to simmer; reduce heat to low and simmer slowly until flavors are blended, about 3 minutes; set sauce aside. (Sauce can be cooled, covered, and refrigerated for up to 2 days; reheat before assembling lasagna.)

3. Mix ricotta, 1 cup Parmesan, basil, egg, salt, and pepper in medium bowl with fork until well-combined and creamy; set aside.

4. Soak the GF no-boil noodles in water in the casserole dish for 3-4 minutes.  Remove noodles when they are soft enough to layer.  Please note they make stick together and begin to crumble if left too long in water.  May be best to lay them all out on a plate prior to layering in casserole dish.

5. Coat the bottom of a casserole dish with 1/4 cup of sauce.  Assemble first layer of noodles (you may need to break into pieces to cover the dish as GF noodles are thinner than others.) Add a tablespoon of the ricotta mixture throughout the the dish (approximately three scoops on each row).  Cover with shredded mozzarella, and then cover with meat sauce.

6. Repeat layering of noodles, ricotta, mozzarella, and sauce two more times. Place 3 remaining noodles on top of sauce, spread remaining sauce over noodles, sprinkle with remaining cup mozzarella, then with remaining 1/4 cup Parmesan. Lightly spray a large sheet of foil with nonstick cooking spray and cover lasagna. Bake 15 minutes, then remove foil. Return lasagna to oven and continue to bake until cheese is spotty brown and sauce is bubbling, about 25- 40 minutes longer or until you see the cheese browned on top. Cool lasagna about 10 minutes; cut into pieces and serve.

Friday, December 10, 2010

Chicken Canzanese: Easy one skillet recipe for gourmet style meal

Last night I was feeling ambitious and decided to tackle a new recipe found on CooksIllustrated.com for Chicken Canzanese.  It is basically browned chicken thighs cooked in white wine, rosemary, sage and chicken broth in a cast-iron skillet, or other oven safe cookware.  I surprised myself at how good this came out!


It called for all-purpose flour to thicken the sauce but I used cornstarch instead, which was a bit tricky and I needed more than the recipe called for.  I've reflected that change below in the recipe details.  I paired this with simple roasted russet potatoes with olive oil and rosemary, which was easy to prepare as this all went into the oven at the same time.  Since I was using boneless thighs, I reduced the cooking time to 40 minutes and it was perfect.  Great meal and a delicious sauce!! 

Ingredients
1 tablespoon olive oil
2 ounces prosciutto (1/4 inch thick), cut into 1/4-inch cubes
4 medium garlic cloves, sliced thin lengthwise
8 bone-in, skin-on chicken thighs (about 3 pounds), trimmed of excess fat and skin

Ground black pepper
3 teaspoons GF flour or cornstarch
2 cups dry white wine
1 cup low-sodium chicken broth
4 whole cloves
1 (4-inch) sprig fresh rosemary , leaves removed and minced fine (about 1/2 teaspoon), stem reserved
12 whole fresh sage leaves
2 bay leaves
1/4-1/2 teaspoon red pepper flakes
1 tablespoon juice from 1 lemon
2 tablespoons unsalted butter

Table salt

Instructions

  1. Adjust oven rack to lower-middle position and heat oven to 325 degrees. Heat 1 teaspoon oil in 12-inch heavy-bottomed ovensafe skillet over medium heat until shimmering. Add prosciutto and cook, stirring frequently, until just starting to brown, about 3 minutes. Add garlic slices and cook, stirring frequently, until garlic is golden brown, about 1½ minutes. Using slotted spoon, transfer garlic and prosciutto to small bowl and set aside. Do not rinse pan.
  2. Increase heat to medium-high; add remaining 2 teaspoons oil and heat until just smoking. Pat chicken dry with paper towels and season with ground black pepper. Add chicken, skin side down, and cook without moving until well browned, 5 to 8 minutes. Using tongs, turn chicken and brown on second side, about 5 minutes longer. Transfer chicken to large plate.
  3. Remove all but 2 tablespoons fat from pan. Sprinkle GF flour or cornstarch over fat and cook, stirring constantly, for 1 minute. Slowly add wine and broth; bring to simmer, scraping bottom of pan with wooden spoon to loosen browned bits. Cook until liquid is slightly reduced, 3 minutes. Stir in cloves, rosemary stem, sage leaves, bay leaves, red pepper flakes, and reserved prosciutto and garlic. Nestle chicken into liquid, skin side up (skin should be above surface of liquid), and bake, uncovered, until meat offers no resistance when poked with fork but is not falling off bones, about 1 hour 15 minutes. (Check chicken after 15 minutes; broth should be barely bubbling. If bubbling vigorously, reduce oven temperature to 300 degrees.)
  4. Using tongs, transfer chicken to serving platter and tent with foil. Remove and discard sage leaves, rosemary stem, cloves, and bay leaves. Place skillet over high heat and bring sauce to boil. Cook until sauce is reduced to 1¼ cups, 2 to 5 minutes. Off heat, stir in minced rosemary, lemon juice, and butter. Season to taste with salt and pepper. Pour sauce around chicken and serve.

Thursday, December 9, 2010

Spread the love: Perfect cheesy appetizer

Did you know Alouette cheese spreads are gluten-free? Serve this along with some rice crackers or nut-thins for a perfect appetizer you and your guests will love!

Or, you just eat this as a quick snack (as I just did!)  It is also great with some carrots or other veggies.  The spinach artichoke one is a great substitute for traditional spinach dip.

Monday, December 6, 2010

Happy Chanukah! Gluten-free Potato Latkes

Traditional potato latkes use Matzo meal or some other type of gluten-infused binder, which makes it difficult for me to enjoy the holiday with all its greasy goodness.  However, thanks to this Cooks Illustrated recipe and my handy-dandy Cuisinart 9-cup food processor, I was in latke heaven last night!!


The trick to these are to make sure they are drained of as much liquid as possible before frying.  I used Yukon gold potatoes, and cut the recipe down to half since I was only making this for two people.  We paired this with pork chops (I know...not very kosher!!) with a white wine & mushroom sauce and green beans to make a great meal.


Ingredients

2 pounds Yukon Gold potatoes or russet potatoes, peeled
1 medium yellow onion , peeled and cut into eighths
1 large egg
4 medium scallions , white and green parts, minced
3 tablespoons minced fresh parsley leaves
1 1/2 teaspoons table salt

Ground black pepper
1 cup vegetable oil for frying

Instructions

  1. Grate potatoes in food processor fitted with coarse shredding blade. Place half the potatoes in fine mesh sieve set over medium bowl and reserve. Fit food processor with steel blade, add onions, and pulse with remaining potatoes until all pieces measure roughly 1/8 inch and look coarsely chopped, 5 to 6 one-second pulses. Mix with reserved potato shreds in sieve and press against sieve to drain as much liquid as possible into bowl below. Let potato liquid stand until starch settles to bottom, about one minute. Pour off liquid, leaving starch in bowl. Beat egg, then potato mixture and remaining ingredients (except oil), into starch.

  2. Meanwhile, heat 1/4-inch depth of oil in 12-inch skillet or sauté pan over medium-high heat until shimmering but not smoking. Working one at a time, place 1/4 cup potato mixture, squeezed of excess liquid and pressed into 1/2-inch thick disc, in oil. Press gently with nonstick spatula; repeat until five latkes are in pan.

  3. Maintaining heat so fat bubbles around latke edges, fry until golden brown on bottom and edges, about three minutes. Turn with spatula and continue frying until golden brown all over, about three minutes more. Drain on a triple thickness of paper towels set on wire rack over a jelly roll pan. Repeat with remaining potato mixture, returning oil to temperature between each batch and replacing oil after every second batch. (Cooled latkes can be covered loosely with plastic wrap, held at room temperature for 4 hours, transferred to a heated cookie sheet and baked in a 375-degree oven, until crisp and hot, about 5 minutes per side. Or, they can be frozen on cookie sheet, transferred to zipper-lock freezer bag, frozen, and reheated in a 375-degree oven until crisp and hot, about 8 minutes per side). Season with salt and pepper to taste and serve immediately.

Thursday, December 2, 2010

Chicken in a Pot: Perfect for rainy night!

Last night, I tried a recipe from FreshDirect.com which is simply a whole chicken cooked slowly in a Dutch oven for about 2 hours.  It actually came from a book, from "Recipes from Home" by David Page and Barbara Shinn.


It was super easy to prepare and very good - all gluten-free!  It is the type of meal you can make over the weekend and have leftovers during the week.  The chicken was so good it fell off the bone when plated.  And now I have a whole bunch of chicken soup! 


1 chicken, about 3 1/2 pounds, cut up into parts
2 tablespoons unsalted butter
2 tablespoons olive oil
2 cups diced yellow onions (1/2 inch dice)
6 garlic cloves, peeled and minced
3 1/2 cups diced celery (1/4 inch dice)
3 1/2 cups peeled and diced carrots (1/4 inch dice)
2 fresh bay leaves
2 fresh thyme sprigs
1 cup gf chicken stock
1/2 cup dry white wine
1 (28-ounce) can stewed tomatoes
Kosher salt and freshly ground black pepper to taste
2 tablespoons minced fresh herbs, such as parsley, thyme and/or chives


Preheat the oven to 300° F.
Cut the chicken into 8 pieces: 2 legs, 2 thighs, 2 breasts, and 2 wings
Melt the butter with the olive oil in a large Dutch oven over medium heat. Add the onions and garlic and cook until they are softened, about 4 minutes. Add the celery, carrots, bay leaves, and thyme sprigs and cook for 4 to 5 minutes. Add the chicken, stock, wine, and tomatoes and season with salt and pepper.
Cover the Dutch oven and place it in the oven for 1 1/2 hours. The chicken should be falling-off-the-bone tender and there should be a good amount of broth. Remove the bay leaves and thyme sprigs and garnish with the fresh herbs. Serve hot.

Wednesday, December 1, 2010

Key to a Great Brisket: Onion Soup Mix

As Chanukah is upon us, I am craving my mom's brisket.  Here is a great and easy recipe to create a hearty meal when you have company.  Or just to enjoy on a cold or rainy night. 


And the trick to this great dish, is finding the perfect onion soup mix.  As luck would have it, a kosher brand, Osem, available mostly during Passover, is gluten-free and delicious!!  It is also available to buy on Amazon.

Simply take your brisket and season with salt and pepper on both sides, then place the fat side down into a roasting pan.  Add about 1-2 cups of water and/or beef broth to the pan.  I used Herb Ox beef boullion (also gluten-free).   Add the dry onion soup mix on top of the brisket but don't put too much on as it is quite salty.

I also added some cut potatoes into the pan and added the onion soup mix on top of those as well.  Make sure your potatoes are all the same size and don't overcrowd the pan.

Place in the oven at 350 degrees.  Keep checking every 30 - 45 minutes to make sure the water doesn't cook off.  You should make sure there is always enough water in the pan.  It should cook about 3 hours.  If it looks like the brisket is getting burnt on top, cover with foil for the last hour or so.  There is also a simple recipe on cooks.com that calls for the brisket to be wrapped in foil.

When removing the pan from the oven, let the brisket sit for about 15 minutes on a cutting board and tent with foil to let the juices redistribute into the meat.  You can pair this dish with spinach, broccoli or any green vegetable to round out a great meal.